

Surely you remember the method to capture the screen that we have all used at some time. If we go back to the days of Windows 10 you surely remember how confusing it was to take a screenshot. Well, we had to press the “Imp Pnt” key, then paste it into Paint and save it.
Today from our phones we can take a screenshot with our finger in a matter of seconds. Therefore, Windows 10 being the most used operating system provides us with several ways to take a screenshot.
There are many methods and if you are here you will surely be interested in knowing what they are, therefore we will teach you.
Keep in mind that these methods only work in Windows 10, so if you have Windows 8 or 8.1, we recommend updating.
The fastest method to capture screen in Windows 10.
This is the simplest and fastest method to take a screenshot in Windows 10. It is also the most useful as it saves the screenshot on the system and is also copied to the clipboard.
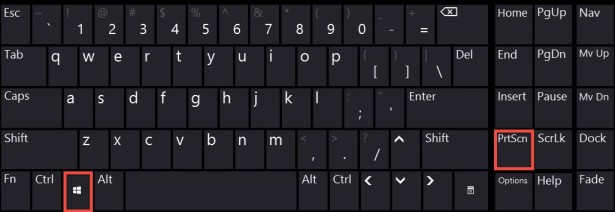
Without further explanation, to carry out this method you will only have to press the Windows key + “Imp Pnt” (Print screen key).
If you want to locate the screenshot, it can be found in “My images” – “Screenshots”.
The format of the screenshot is PNG and is saved with the name “Screenshot”.
To give you an idea, all your screenshots will appear as in the following image:
In the case that you make many screenshots, I recommend renaming them for a better organization.
Method to capture a single window in Windows 10.
If you don’t want to take a screenshot of the entire screen, Windows 10 offers us the possibility of taking a screenshot of a window. This method can be useful if you want to take screenshots of your browser for example. Also, if you have several windows open and you don’t want the ones in the background to be seen. You did not know? Well now you know.
In this case the capture is not saved anywhere but is copied directly to the clipboard. Therefore, you can paste it in some photo editor or simply in Paint.
To carry out this method you will have to press the ALT key + “Imp Pnt” (Print screen).
If you did not understand the procedure, I will explain it to you with an example:
Imagine that you want to take a screenshot of the Notepad but not your wallpaper to show. Well, if you do it with the previous method.
But if you do the capture with ALT + Print Screen, it will capture only the active window, that is, only the notepad. (As long as the window is active).
As you may notice, only Notepad is displayed and not the wallpaper.
Capture screen in Windows 10 with Cropping and Annotation.
You may already know. But if we are talking about taking screenshots in Windows 10, we could not ignore this tool. Of all, it is the most complete since we can cut the capture, edit it and save it. To make a capture with cropping and annotation we will simply have to press the WINDOWS + SHIFT + S key. When you do, we can automatically select which part of the screen we want to capture or choose the “full screen” option.
To see the capture, save it, copy it or edit it we will have to go to Windows notifications and click. Here we leave you an image in case you did not understand this last step.
As the arrows indicate, clicking on the screenshot will open the editor I mentioned above. If you pay attention to the image (the other arrow) you can also execute Cropping and Annotation from there.
Take a screenshot in Windows 10 with the Snipping Tool.
The “Snipping” tool is the one you used to capture the screen in Windows 7. Therefore, the previous “Snipping and Annotation” method is its successor. To use this tool simply search for “Snipping Tool” in the search bar of the toolbar. Then run the program and to take a screenshot in Windows 7 or Windows 10 select “New”.
After selecting the part of the screen you need; an editor will open with some editing options. It is also possible to save the file, send it by mail, print it etc.
The formats in which we can save the capture are JPEG, PNG, GIF and HTML (MHT).
This option is very viable if your computer is a little slow since it works very fast. Imagine that it is used from Windows 7.
If some method of combining letters to crop the screen does not work for you, add the Fn key, I assure you that it will work perfectly. For example, Fn + Windows + Imp Pnt.